Nothing is more frustrating than ending up with a video recording loaded with unwanted background sound. When you are
shooting a video, you should be careful to turn off all backdrop noises. Otherwise, it will only spoil your narration and turn the whole thing into something very chaotic. But, don’t worry - the good news is you can actually remove audio from a video. The most important tool that you will need here is a good video editor program that enables you to remove unwanted audio from the video.
The post below offers a brief on how to remove unwanted sound from your recorded video with the help of a video editor program.
Step 1
Install the program
First, you will download and install the video editor program on your system. But before the final selection, it would be better to get a comparative study on 4-5 such potential video editor programs. Your chosen one should be from a reputed brand and must be backed by rave reviews. Movavi Video Editor is a good option here. Movavi is an internationally renowned brand and its cutting edge video editor has earned rave reviews. Not only can it remove unwanted audio but can also allow one to include new music into the video. Besides, the program is packed with special effects, filters and interesting transitions.
 |
| Movavi Video Editor |
Step 2
Add your video
After the program has been installed, we will need to add the video to the program.
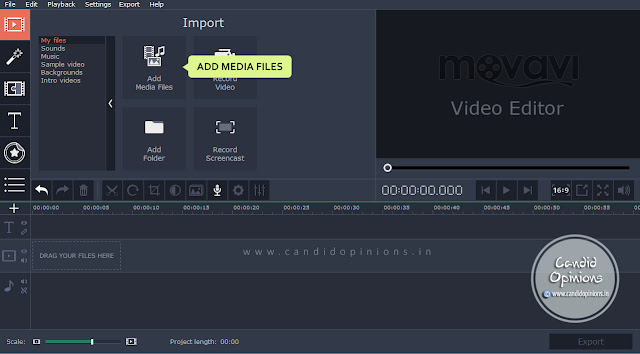
Go to program window and look for something like “Create project in full feature mode”. Now, look for a tab called “Add Media Files”. Click on it. As you click on it, you will be allowed to find your desired video from your system folder and add it to the editor program window.
 |
| Movavi Video Editor |
Step 3
Remove the unwanted audio
Now, we have reached at the main stage of our process. This is where we will remove the unwanted audio from the added video.
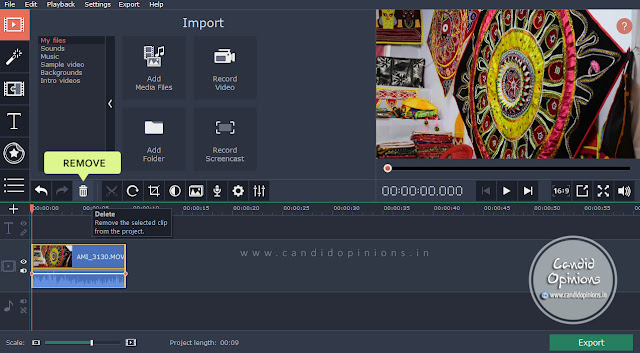
So, first you will need to click on the sound track that has been added to the editor program timeline when you added the video. Once you click on it, look for the “Remove” tab. Click on the tab to delete the chosen audio from your video.
 |
| Movavi Video Editor |
Step 4
Add preferred music
Do you wish to add some other music in place of the removed audio track? It could be a nice instrumental that can complement the very theme of your video. In that case, you have two options here. One you can add music from your collection stored in the system folder. If your preferred music is not stored in your system, you should store it first before running the editor program. The other option is to choose music from the library of the video editor program only.
First, we will discuss how to add music to the video from your collection. Look for a tab called “Add Media Files” and click on it. It will enable you to find music file from your folder and add it to the editor program window- just like you added the video in the second step.
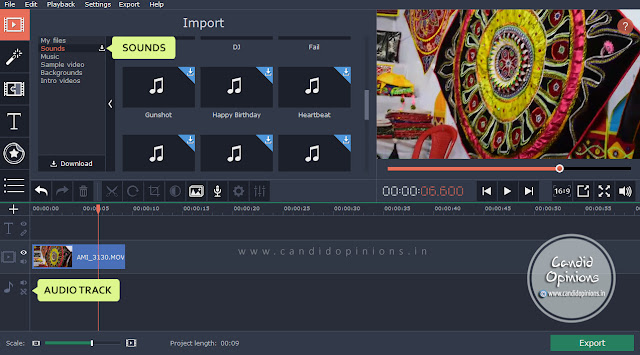
If you want to music from the library of the editor program, look for a tab called “Sounds”. Click on it, choose a preferred audio track and add it to the program window.
 |
| Movavi Video Editor |
Step 5
Save your video
Now, we have reached at the final stage of the process. This is where we will save the video.
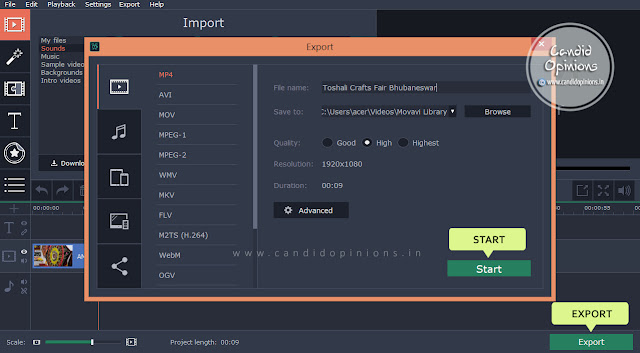
Go to the tab called “Export” and click on it. You will be allowed to choose the preferred format for your modified video. After that, simply click on “Save” button. The program will convert the video in specified format and save it in its library automatically.
 |
| Movavi Video Editor |
Thus with Movavi Video Editor, the task of removing unwanted audio from a video becomes fairly easy. Try this software and do share your experience here.